
Schedules
Assign shifts to your team in Day / Week / Month views, check staffing is adequate, then hit Save changes to store a draft and Publish so employees can see their shifts.
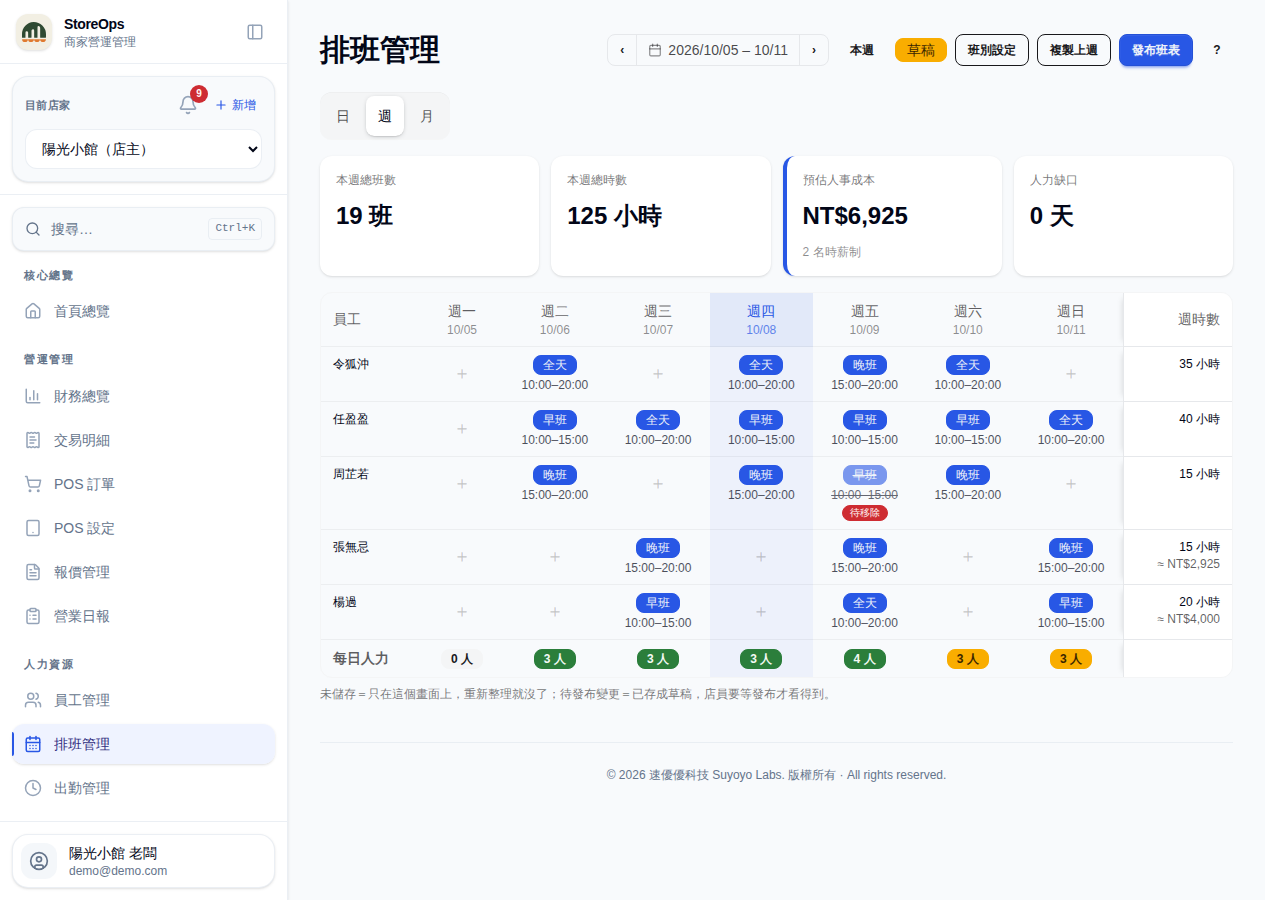
Every editing action here (assigning, clearing, adjusting times, saving, copying last week, publishing, shift templates) needs manager permission. Staff see published schedules only — cells aren't clickable for them, and drafts are visible to managers and owners only.
The three states of a schedule
Edits don't take effect straight away. Every change has to be saved into a draft first, then published before employees see it and get notified.
| State | Managers / owners | Employees | Where it lives |
|---|---|---|---|
| On screen (unsaved) | Only you, the person editing — other managers can't see it | No | Your browser only; gone on refresh, on a store switch, or when you confirm leaving the week |
| Draft (saved, unpublished) | All managers and owners; cells are tagged Unpublished change or Pending removal | No — and a shift tagged Pending removal still shows to them as it was | Stored on the server; still there on another device or the next day |
| Published | All managers and owners | Yes, and they get a notification when you publish | Stored on the server as the real schedule |
A legend under the table says the same thing: "Unsaved = on this screen only, gone after a refresh. Unpublished change = saved as a draft; staff see it only after you publish."
Switch views and dates
- Open Schedules from the sidebar. The Day / Week / Month tabs sit under the title on the left and start on Week.
- Use ‹ › to the right of the title to move one day / week / month, This week or Today to jump back to now, or click the date itself to pick a specific date, week, or month.
- Day view shows each employee's shift as a bar on a timeline; the bottom Slot staffing row shows how many people are on the floor in each half-hour.
- Month view covers the whole month — each cell shows only the first couple of characters of the shift name, and Monthly on the right totals that employee's shifts and hours. Clicking any day jumps back to Week view on that week so you can edit right away.
Switching between Day / Week / Month never touches your unsaved edits. Moving to another date range (previous week, next month…) asks for confirmation first, because those edits leave the screen while still blocking publishing.
Read the week view
- The badge next to the page title shows the week's state: Draft means there are saved-but-unpublished changes; Published means everything is out.
- Whenever cells are still unsaved, an extra N unsaved badge appears next to it.
- The four cards on top are Total shifts, Total hours, Est. labor cost, and Staffing gaps — the gap card turns red and lists the weekdays that are short. These figures include your unsaved edits, so you can see the impact before saving.
- Each table row is one employee. In a cell, the top line is the shift name and the bottom line the start–end time. The right-hand Weekly hours column totals the week, with an ≈ amount below it estimating pay.
- The small label in the corner of a cell is its state: Unsaved, Unpublished change, or Pending removal. No label means the cell is published and untouched.
- The bottom Daily staffing row is colour-coded: red = clearly short-handed, yellow = thin, green = fine. Thresholds are set in HR Settings.
Est. labor cost only counts employees on an hourly rate who have a pay rate set — monthly-salary staff aren't included, so treat it as a rough estimate, not payroll. Pay amounts (the ≈ figures and the labor cost card) are hidden from staff.
Assign a shift
- Click the empty cell (the one showing +) for that employee and day.
- Pick a shift from the menu — its start and end time are applied automatically.
- Click the cell again to swap to a different shift, or choose Clear to remove it.
- When you're done with the whole week, click Save changes at the top.
Steps 1–3 only change your screen. Cells are tagged Unsaved and no other manager can see them; refreshing before you save throws them all away. Clearing a shift that was already published doesn't remove it immediately — the cell is struck through and tagged Pending removal, and it disappears for real on your next publish. That way employees keep seeing the old shift until you republish. Changed your mind? Click the cell and choose Cancel removal. To drop one cell's change that is already saved as a draft: click that cell, choose Cancel this change, then Save changes again.
Adjust the end time for one day
- Click a cell that already has a shift and choose Adjust end time… at the bottom of the menu.
- Enter a new End time — the hint below the field shows the template's original time.
- Click Save to close the dialog. At this point it's still an on-screen change, and the cell is tagged Unsaved.
- Click Save changes at the top of the page to store it.
This only changes that one cell. The shift template and all other days stay as they were. Adjusted cells show their time in a different colour with a trailing "*"; hover it to see the original time. The end time has to be later than the template's start time, otherwise the dialog refuses it.
Save and discard
- Save changes appears at the top whenever cells are unsaved. It stores the whole batch as a draft in one go (all of it or none of it) and reports how many cells were saved.
- Discard edits throws away every unsaved edit on screen. Drafts you already saved are not affected. It asks for confirmation first.
- Refreshing (F5) does the same as discarding — unsaved edits never survive. To drop just one cell, click it and choose Cancel this change or Cancel removal.
- Changing week / month, or leaving the page with unsaved edits prompts you first; confirming leaves and drops the edits.
- Switching store is not blocked: unsaved edits are dropped and you get a "Store switched — unsaved schedule edits were discarded" notice.
- While anything is unsaved, Publish is disabled, with the tooltip "Save or discard your unsaved edits first".
Copy last week
- Land on the week you want to fill (or, in Day view, on any day of that week).
- Click Copy last week (top right).
- A message reports how many shifts were copied and how many were skipped.
Cells that already have a shift are never overwritten, and employees not employed on that date are skipped — both count as "skipped". Copy last week writes drafts directly, skipping the unsaved stage, so there's nothing to save afterwards — but you still have to Publish before employees see anything. One-off end-time adjustments from last week are not carried over; copied shifts use the template's original times.
Publish and notify the team
- When the week has drafts, Publish appears at the top right. It stays disabled while anything is unsaved — save or discard first.
- Clicking it opens a confirmation dialog showing which channels the notification goes to and letting you pick who to list in the message; choose Publish without notifying to skip the notification.
- On success you'll see how many shifts were published and removed; if you've set up a Schedule published notice rule, the message adds that the notification was sent.
- Once everything in the week is published, Publish is replaced by Resend notification — use it to remind the team again.
Only publishing makes a change visible to employees. Until then, no matter how many times you edit, they still see the last published version. With no channel or nobody selected, the dialog warns that the schedule will be published without sending a notification. If the notification can't be delivered, a separate error appears — check your channels under Settings → Notifications. Pressing Resend notification without a "Schedule published notice" rule prompts you to add one in notification settings first. Month view hides the publish / copy / resend buttons — switch back to Week or Day view to use them. (Save changes and Discard edits still work in Month view.)
Manage shift templates
- Click Shift templates (top right).
- Existing shifts lists each template's name and time with Edit and Delete buttons.
- Below, fill in Shift name (e.g. Morning), Start time, and End time, then click Add shift. While editing, the button becomes Update shift with a Cancel edit next to it.
Deleting a template does not affect shifts already scheduled — they keep their original times. The first time a store opens this page, three templates (Morning, Evening, All day) are created automatically; rename or delete them as you like. The same list can also be maintained on the HR Settings page.
Before you have employees
If the store has no employee records yet, the page shows "No employees yet. Add employees before scheduling." Click Go to Employees to set them up first, then come back.